About Me

My photo
My blog's main subjects are sewing, the thing in which I am experienced the most, and beadwork, which is, in fact, pushed me into blogging. I am also engaged in knitting and crocheting. All together they are the set of skills which I use to make my wardrobe my whole life. These are not my only interests, I also like the English language (that's one of the reasons that my blog is bilingual), try to travel around my country and abroad (when can afford it), am interested in art (to the degree of a dilettante but nevertheless) and adore the people who can create anything beautiful or useful whatever it is :-) So welcome to a needlecrafter diary!

26 August 2017

Yellow Flared Trousers, or Indulgence in Wants


Despite I am able to sew a lot of things of different designs and I can draft most of those designs (I don't say all of them only because as I am not engaged in that activity now but the time and the technologies develop, I don't follow the innovations so cannot be modern enough to make all:-)) for my wardrobe I select things pretty meticulously. It means that I only chose those patterns of clothes that emphasize or disguise what is needed corresponding to my appearance. I'd like to add some more extravagance to my wardrobe but I am always restricted with the reality of my body's shape. I hope I am pretty objective with that so never make things that don't suit me. But "never say never" :-) And it means that exactly like a person, who keeps to the diet to loose some weight, once in a while eats a cake, I want to make some not very appropriate thing just because I want it. The result of that can be any. For example, today I yielded the temptation to sew yellow flared trousers :-)


All about the waistcoat is here, the top is here, all about the earrings is here.


Штани-кльош, або Потурання бажанням

Хоча я вмію шити багато речей різних фасонів і можу сконструювати більшість з тих фасонів (не кажу всі лише тому, що оскільки я таким зараз не займаюся, а технології розвиваються, я ж не слідкую за тими інноваціями, тож і не можу бути достатньо сучасною, щоб зробити їх всі:-)), для мого гардеробу я відбираю речі доволі прискіпливо. Це означає, що я обираю лише ті моделі одягу, які або підкреслюють або приховують те що треба відповідно до моєї зовнішності. Мені б хотілося додати трохи більше якогось навіженства до мого гардеробу, але я завжди обмежена реаліями форми мого тіла. Сподіваюся, я досить об'єктивна в цьому ставленні, тому ніколи не роблю речей які б мені не пасували. Але ж "ніколи не кажи ніколи" :-) І це означає, що подібно до людини, яка сидить на дієті, щоб схуднути, але часом з'їдає тістечко, я хочу зробити якусь невідповідну річ лише тому, що хочу, а вже який з того буде результат, то вже як прийдеться. Наприклад, сьогодні я поступилася бажанню пошити жовті штани кльоші :-)


(Все про жилет - тут,  топ тут, про сережки - тут.)


I am not a great expert in sewing trousers and not a great trousers wearer as well but theoretically I know a lot about their sewing and also wear them anyway:-)
For yellow linen I chose pattern of trousers of model #8 from Burda Special Vintage 2016.


Я не великий експерт з пошиття штанів і не так вже і люблю їх носити, але теоретично про їхнє пошиття знаю багато і все одно їх вдягаю при нагоді:-)
До жовтого льону, я обрала модель штанів зі зразка №8 з Burda Special Vintage 2016.


There is nothing special in this sewing so I just post photos  of processing the fly. May be it will be useful.

Нічого особливого в цьому пошитті немає, тому я лише розміщую фото обробки застібки. Можливо це буде корисно.


And as always, when I sew from thin fabricі, I sew bands in this way. At first I stitch right side of the band to the wrong side of the trousers...


І, як завжди коли шию речі з легких тканин, пояс я пришиваю таким чином. Спочатку настрочую пояс лицевою стороною до зворотнього боку основної деталі...


...and then fold the band and stitch it to the right side.


...а потім згинаю пояс і настрочую на лицевій стороні.


One more old-fashioned tip as for the hem. It used to be the rule but now it is mostly ignored... including by me:-) But for the better hem line it should be cut 1 cm longer in the centre of the back half and 1 cm shorter in the centre of the front half. I did it this time.


Ще один старомодний прийомчик щодо підшивки низу штанів. Колись це було правило, а зараз цим переважно нехтують, і я теж:-) Але для кращої лінії низу, її варто кроїти на 1 см довше по центру задньої половинки і на 1 см коротше по передній. Цього разу я це зробила.


22 August 2017

Asymmetric Wrap Dress, or Jungle Theory

Well... I had so many thoughts about the subject that don't know what to start with not to fall in chaos:-) The simple question occurred to me when seeing the fabric of this dress in the store: why it is so attractive for me and, in general sense, why jungle prints are popular. I am not obsessed with fashion shows, although enjoy watching some now and then, but even I know that the topic of jungle is pretty much in use for the materials for summer clothes (the same concerns other wild nature prints as well). My reasoning brought me back to the thoughts about stereotypes  again. I mean real jungle is not so pleasant to stay for a long time: it is a humid stuffy place without chances to relaxed wandering because of abundant vegetation, it is full of poisoning plants, insects and wild animals so to travel there one needs to care about saving health much more than about a wardrobe. But many of us yet dream about visiting that site. Probably because the dream is about the jungle we read in Kipling's "The Jungle Book" or see in a bunch of funny movies, like, let's say... "Romancing the Stone" or "George of the Jungle"  or the jungles reflected at such fabric's print:-))
The bracelets and the earrings are made specially to the dress.


Сукня з асиметричним заходом, або Теорія джунглів


У мене було стільки думок з цього приводу, що не знаю, з чого і почати, щоб не впасти в хаос:-) Просте питання спало мені на думку, коли я побачила тканину, з якої пошито цю сукню, у крамниці: чим вона мене  так вже приваблює і, в загальному сенсі, чому тканини з візерунком джунглів такі популярні. Я не божеволію від модних показів, хоча із задоволенням час від часу трохи їх дивлюсь, але навіть я знаю, що тема джунглів дуже багато використовується  в тканинах для літнього одягу (так само це стосується і інших візерунків з сюжетами дикої природи). Мої міркування знову повернули мене до думок про стереотипи. Тобто мається на увазі, що справжні джунглі не такі вже і приємні, щоб надовго там залишатися: це вологе і задушливе місце з рясною рослинністю, яка не дає жодних шансів невимушеним прогулянкам, там повно отруйних рослин, комах і диких тварин, тому, щоб там подорожувати, треба піклуватися більше про збереження здоров'я ніж про гардероб. Але ж чому багато хто з нас все ж таки мріє там побувати? Мабуть тому, що ця мрія про джунглі, про які ми читаємо в "Книзі джунглів" Кіплінга або бачимо у багатьох милих фільмах, на кшталт "Романа з каменем" або "Джорджа з джунглів" або про джунглі, які зображені у подібних візерунках тканин:-)
Набір браслетів і сережки зроблені спеціально до цієї сукні.


I want to mention at once that sewing the dress #131 from Burda 10/2014 is not for beginners, it is for nonfaint-hearted experienced tailors :-)
I cannot say I liked the pattern from the first sight but it made me interested and I wanted to try it anyway. However I couldn't match the fabric because I saw not the "jungle" dress but "savanna":-) When I bought this material (for other project), it was clear it meant to be for that pattern.
In the magazine the dress is lined and all the bodice is reinforsed with interfacing so, in fact, it has too many layers. I believe the jungles is the place where you mostly think what to take off than what to put on so I had to change some processing of the dress.


Одразу хочу обмовитися, що пошиття сукні 131 з Burda 10/2014 не для новачків, це для міцних духом досвідчених кравчинь:-)
Не можу сказати, що мені ця модель сподобалася з першого погляду, але хотілося спробувати пошити її в будь якому випадку. Проте ніяк не могла підібрати тканину, тому що мені сукня видавалася більше на тему "савани" ніж "джунглів":-) Коли купила цю тканину (для іншого проекту), стало зрозуміло, що вона призначена для цієї моделі.
В журналі сукня пошита на підкладці і вся верхня частина повністю продубльована прокладкою, тому має забагато шарів. Як на мене джунглі - це така місцина, в якій більше переймаєшся тим, щоб з себе зняти, а не вдягти,  тож довелося до певної міри змінити обробку сукні.


Probably it was the first time in my life when I read the instruction in the magazine from the beginning to the end to have the common idea of what to do. Comparing with it my changes are so insignificant that can't be named modifications.
Instead of the lining, I cut  the facings for the bodice's  neck and arm holes. I was short of the fabric so used a piece of other material.


Мабуть перший раз в житті я прочитала інструкцію в журналі спочатку до кінця, щоб мати загальне уявлення, що я маю робити. В порівнянні з нею, мої зміни такі незначні, що їх не можна назвати модифікаціями.
Замість підкладки, я покроїла обшивки для вирізу горловини та пройм. Основної тканини мені не вистачило, тож довелося використати клаптик іншої.


The ready front part looks in this way. The facing of the detail #3  was folded twice and basted: for 1 cm (seam allowance) and for 4 cm, later I top stitched it. The inner edge of the wrap part (detail #6/6a), was folded for 1 cm and top stitched, too, but at once and not to the end for about 20 cm to hem the ready dress. Later the top stitching was finished.


Готова передня частина виглядає так. Обшивку деталі №3 було підгорнуто двічі  і заметано: на 1 см (припуск на підгибку) і на 4 см, пізніше я його відстрочила. Внутрішній край заходу (деталь №6/6а) був підігнутий на 1 см і теж настрочений, але одразу і не доходячи десь см 20 до кінця, щоб підігнути низ готової сукні. Пізніше відстрочування було закінчено.


Sewing the back is much more interesting and weird :-)
After  the strap of detail 5/5a is ready, sew the back of the bodice. I made it in two stages (there is no need in it but nevertheless...), at first from the side seams to the strap and then the strap part.


Пошиття спинки набагато цікавіше і, до того ж, чудернацьке:-)
Після того як бретель деталі №5/5а готова, пришиваємо спинку верху. Я це робила в два етапи (хоча в цьому немає необхідності). Спочатку від бокових швів до бретелі, потім частину бретелі.


Then stitching the facing to the back.


Потім пришиваємо обшивку до спинки.


The ready back looks like this.


Готова спинка виглядає так.


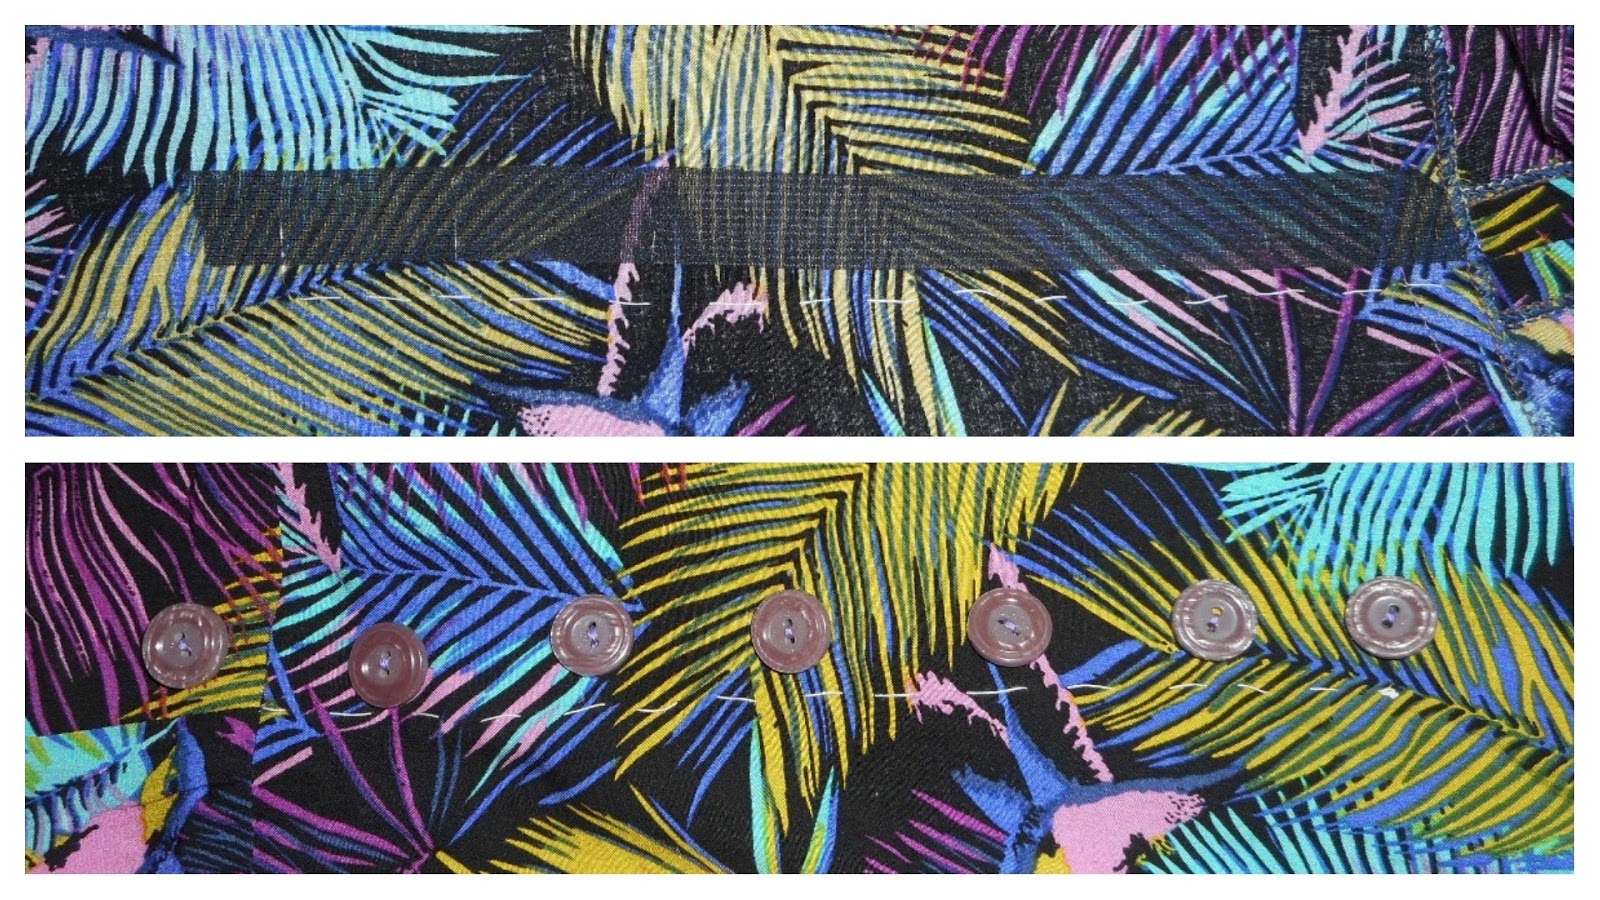
The front wrap part is supposed to be... free. It means the buttons are only decor here. But as you see at one of the photos, the dress can be worn in that way in the jungle only indeed. In stone jungle, where people live, it is impossible. So from the waist down along the wrap part edge I arranged 7 button holes.


Передня частина заходу задумана бути... вільною. Це означає, що ґудзики в цій моделі лише декор. Але, як видно на одній із світлин, так сукню можна носити справді лише в джунглях. В кам'яних джунглях, де живуть люди, це неможливо. Тому від талії вниз вздовж краю правої частини заходу я розташувала 7 петель. 


And sewed 7 buttons. As at the position of the buttons the dress has the only layer of fabric, I reinforsed the position with a stripe of interfacing.


І пришила 7 ґудзиків.  Оскільки в місці їх пришивання сукня має лише один шар тканини, те місце я зміцнила смужкою прокладки.


18 August 2017

Hutsul Market Bracelets Set :-)


Making simple things by ready patterns is like an infection: if not to stop it on time, it will absorb you entirely and the treatment will be long and hard:-) So yesterday I made one more bracelet for the set and right now think it will be enough for awhile... at least until that dress is finished.
As during my this year's trip I lived in Hutsuls' land and they are very skillful in many different crafts including weaving, beading, felting, embroidering and knitting. Their things gladden the eyes with bright colours and intricate ornaments and are sold at big local markets so I thought it would be a nice idea to call the set in that way to thank that land for the wonderful vacation and inspiration.


Набір браслетів "Гуцульский базар"


Виготовлення простих речей за готовими зразками схоже на інфекцію: якщо вчасно це не зупинити, то воно тебе повністю поглине і тоді лікування буде довгим і болісним:-) Тож вчора я зробила ще один браслет до набору  і думаю, що поки що з мене досить.. принаймні поки не закінчу ту сукню.
Оскільки протягом цьогорічної літньої подорожі я жила в краю гуцулів, а вони дуже вправні у різних ремеслах, в тому числі у ткацтві, валянні, вишиванні, нанизуванні і плетінні. Їхні вироби милують око яскравими кольорами та хитромудрими орнаментами і продаються на великих місцевих базарах, тож я подумала, що назвати так набір - гарна ідея, щоб подякувати тому краю за чудову відпустку та натхнення.


This pattern is the easiest comparing with the first and the second but nevertheless I remade the bracelet anyway:-)
The tutorial is again from +Potomac Bead Company. This time I had enough leftovers of super duos to make the bracelet so all the materials are like in the video. The confusing moment - the sizing. The designer says about shortening of the bracelet while working on it but to decide how much beads are needed to bead the first row is very individual so must be adjusted personally. for example, I just unpicked the extra seed beads from the beginning of the first row.


Цей зразок найпростіший в порівнянні з першим і другим, але тим не менш я його все одно переробляла:-)
Майстер клас знову від +Potomac Bead Company. Цього разу у мене було достатньо залишків супер дуо, щоб зробити браслет, тому матеріали такі самі як у відео. Момент, що збентежив - визначення розміру. Дизайнерка каже, що під час плетіння другого ряду браслет скорочується, але вирішувати скільки треба нанизувати бісерин для початку - справа цілком індивідуальна і має визначатися особисто. Я, наприклад, просто розпустила зайві бісерини з початку нанизування першого ряду.

17 August 2017

Twins' Wave Bracelet (II)

I don't know what I want more either to bead the planned set of twins' bracelets that I started the day before yesterday or just hope this set will force me to dive into the sewing of the cut dress but not depending on the reasons, the next result of my crafting fun is a new "simple and quick" twin bracelet I made yesterday night.


Браслет "Твінова хвиля" (ІІ)

Не знаю, чого мені більше хочеться чи то сплести запланований набір браслетів з твінів, який я почала позавчора, чи я просто сподіваюсь, що цей набір примусить мене зануритися в пошиття розкроїної сукні. Втім, незалежно від причин, наступний результат моїх рукотворних забав - черговий "простий і швидкий" браслет з твінів, який сплела вчора ввечері.


The tutorial is from +Potomac Bead Company again.
It doesn't concern the post but I like old videos and magazines on seed beading because they use materials possible to buy in any craft store. So one doesn't have to puzzle over the question where to take all those modern beads:-)


Майстер клас знову від +Potomac Bead Company.
Справи не стосується, але мені подобаються старі відео і журнали з бісероплетіння, тому що в них використовуються доступні в будь якій спеціалізованій крамниці матеріали тож не треба морочити голову, де ж взяти всі ті модні намистини:-)


This time I also used twins instead of the superduos. Probably because twins are not so perfect as superduos, at first the twin archs around 8 mm beads were too tight so in the second row I added 15/0, 6/0, 15/0 seed beads instead of 6/0 to make the bracelet keep the shape.


Цього разу я також використала твіни замість супердуо. Але, можливо через те що твіни не такі досконалі як супердуо, спочатку арки навколо 8 мм намистин вийшли надто затягнутими, тому у другому ряду замість бісерин №6 я додавала №15, №6, №15, щоб браслет все ж таки тримав форму.


And one more moment. I guess it is the influence of my sewing experience but nevertheless... Eight motifs were enough for my wrist but when I wore the bracelet, the "loop" motif covered the first motif partly. To avoid that I added extra twins and seed beads after the button.


Ще один момент. Думаю, це вплив мого кравецького досвіду, але тим не менш... Вісім мотивів для мого зап'ястка виявилося достатньо, але коли я вдягла браслет, мотив "петля" частково перекривав перший мотив. Щоб цього запобігти, після ґудзика я додала додаткові твіни і бісерини.

16 August 2017

Twins' Wave Bracelet (I)

I often start my works' descriptions with words "quick" and "simple". And this time cannot but begin the post in the same way as well:-) However, "simple and quick project" doesn't mean I could eat, talk or watch a movie or close my eyes while making it. Otherwise I would never remake the pieces because of missed or added random beads while doing all the mentioned above things:-)


Браслет "Твінова Хвиля"

Я часто починаю описи своїх робот зі слів "швидкий" і "простий". І цього разу не можу не почати допис так само:-) Але "простий і швидкий проект" не означає, що поки над ним працюєш можна щось їсти, розмовляти або дивитися кіно або заплющувати очі під час роботи. Інакше я б ніколи не переробляла вироби через пропущені або зайві намистини поки була б зайнята усім вище згаданим:-)


Right now I expect this bracelet to be the first in a little set of twin bracelets I am going to make to match the dress I cut almost a month ago, before my vacation trip. The bracelet's pattern is simple and I had all the necessary materials to make. With so many advantages the bracelet had no chance not to be beaded:-)


Зараз я розраховую, що цей зразок буде першим з невеличкого набору браслетів з твінів, який я планую зробити до сукні, яку покроїла ще майже місяць тому, перед поїздкою до Карпат.  Модель браслета проста і у мене були всі матеріали для його виготовлення, тож браслет не мав шансів не бути сплетеним:-)


The pattern from +Potomac Bead Company was taken here. Instead of superduos I used twins and instead 3 mm pearls - 4 mm. I didn't do that but I think if to use 4 mm, it would be better to join the pearl with 15/0 seed beads. 


Модель від +Potomac Bead Company було знайдено тут. Замість супердуо, я використала твіни і замість перлини 3 мм - взяла 4 мм. Я цього не зробила, але думаю краще було б з 4 мм перлиною додавати бісер №15.


When the bracelet was ready, it seemed to be uncompleted so I added one more row of archs of three 15/0 between 8/0. I liked this outcome better.


Коли браслет був готовий, він мені здався якимось незакінченим, тому між бісером №8 я додала арки з трьох бісерин №15. Такий результат мені сподобався більше.

13 August 2017

V - neck Pullover, or Reading Contra Knitting :-)

Once upon a time I already orated on the theme of crafts and trips and a couple of weeks ago I came back from my summer journey. This time it was the travelling around the Carpathians including the climbing two mountains, Blysnytsya and Hoverla. Both of times I promised it was  the last try in my life and both of times I was admired of myself (and still am!) because of me reaching those tops as I had never climed before:-) 
Well... to be stick to the point without any other reasoning is not my virtue... So as for the crafts, the topic is still actual and nothing changed since then but the project I worked during the trip... Or, to be exact, was planning to work. And probably I would have done that if only had packed all the necessary tools into the suitcase. But I didn't. I packed the yarn, knitting needles, a front part of the pullover (that had been ready by that moment and I was sure I would need it when assemblying the pullover),  I also took a tapestry needle (by the way, such needles are called Gypsy needles here) to sew the finished parts as I was  sure I would finish all of them. And now what I forgot - the pattern. Generally, nowdays at the Internet era it wouldn't so hard to restore but it didn't occur to me to do that  because after much hiking to be in fever of looking for and printing the pattern was the last thing I wanted to do during the rest. So when wandering Ivano-Frankivsk I came across the bookstore with huge amount of books and very pleasant prices it became clear I wanted to read much more than to knit so bought few books and during the rest of the days read two of them. 

(All about the jewellery is here, about skirt is here.)


Пуловер з вирізом мисом, або Читання проти в'язання :-)

Одного разу я вже просторікувала про рукотворчість під час мандрівок, а пару тижнів тому я якраз повернулася з моєї літньої поїздки. Цього разу це була подорож Карпатами під час якої я навіть вдерлася на дві гори - Близницю і Говерлу. Обидва рази я собі обіцяла, що це була остання спроба в моєму житті і обидва рази я була ( і досі є!) в захваті від  себе через те, що дійшла до тих вершин адже раніше ніколи не підіймалася в гори :-)
Хмм... триматися теми розповіді без усіляких ухилянь на інше базікання - не моя чеснота... Отже щодо рукотворчості, тема  досі актуальна і з того часу нічого не змінилося, лише проект над яким я працювала. Чи, якщо бути точною, планувала працювати. І так би воно мабуть і було, як би я спакувала до валізи все необхідне знаряддя.  Я взяла пряжу, спиці, передню частину пуловеру (яка була на той момент готова і я була впевнена, що вона мені знадобиться коли зшиватиму пуловер), я також взяла циганську голку, щоб зшити готові деталі. А що я забула - опис роботи зі схемами. Загалом, в нашу Інтернет-епоху це не було так вже і неможливо відновити той опис, але мені і на думку це не спало, тому що після стількох піших кидків перейматися пошуками та роздруковуванням схем - було останнє чим би я хотіла займатися на відпочинку. Тож, коли я гуляла по Івано-Франківську і натрапила на книгарню з величезними вибором книжок і дуже приємними цінами, стало зрозуміло, що набагато більше я хочу читати, а не в'язати, купила декілька видань і за решту днів подорожі прочитала два з них.

(Все про прикраси - тут, про спідницю - тут.)


I came back home on very hot days and had no wish to sew in my stuffy workshop. To knit was much easier because it could be done at any part of the house. Thus my pullover transformed from a trip along project to the actual one and here it is:-)
The pattern 170-3 from Drops. I knitted  size L with knitting needles #3 not to recount the stitches as my gauge was a little different. Besides, I have no 5 needles set #3 and was not going to buy it for the only project so the when cast on the back added two more stitches to make them eadge ones, then just sewed the seam (on the bottom photo, the piece was unpicked because I made  a mistake in the pattern but the idea of the sewing is clear).


Я повернулася додому в дуже спекотні дні і не мала бажання шити у моїй задушливій майстерні. в'язати було набагато легше, тому що це можна робити в будь який частині будинку. Так мій пуловер з проекту для мандрівки перетворився на основний і ось він тут:-)
Модель 170-3 від Drops.  Плела розмір L на спицях № 3, щоб не перераховувати петлі, тому що моя щільність плетіння трохи відрізнялася. Крім того, у мене немає набору з п'яти спиці №3, а купувати заради одного проекту я їх не збиралася, тож коли набирала петлі для спинки, додала ще дві на крайні. Потім просто зшила шов (на нижньому фото; цю деталь було розплетено і перев'язано через помилку у візерунку, але щодо зшивання, ідея зрозуміла).


The stitch "slip 2 sts tog as if to K, K1, pass the 2 slipped sts over" I make in the way like on the photo.
The yaarn used for the project - Cotton Soft from YarnArt, taken in two threads. The pullover took 311 gram of the yarn.


Три петлі лицевою - пров'язую як на фото.
Пуловер сплетено з пряжі Cotton Soft від YarnArt в дві нитки. На пуловер пішло 311 грам пряжі.